
Astrophotography
Equipment
Imaging
location: I
image in
northern RI, about 10 miles northwest of Providence, and about 50 miles
away from my hometown near Boston. The light
pollution is moderate, and there is skyglow near the southeastern
horizon from Providence. The Milky Way is faintly present on most
nights, the average LVM is about 5.5, and the site is class 5-6 on the
Bortle
Dark-Sky scale.
Unfortunately, my seeing only averages around 3", and
sometimes worse, at this site.
Mount
and related accessories:
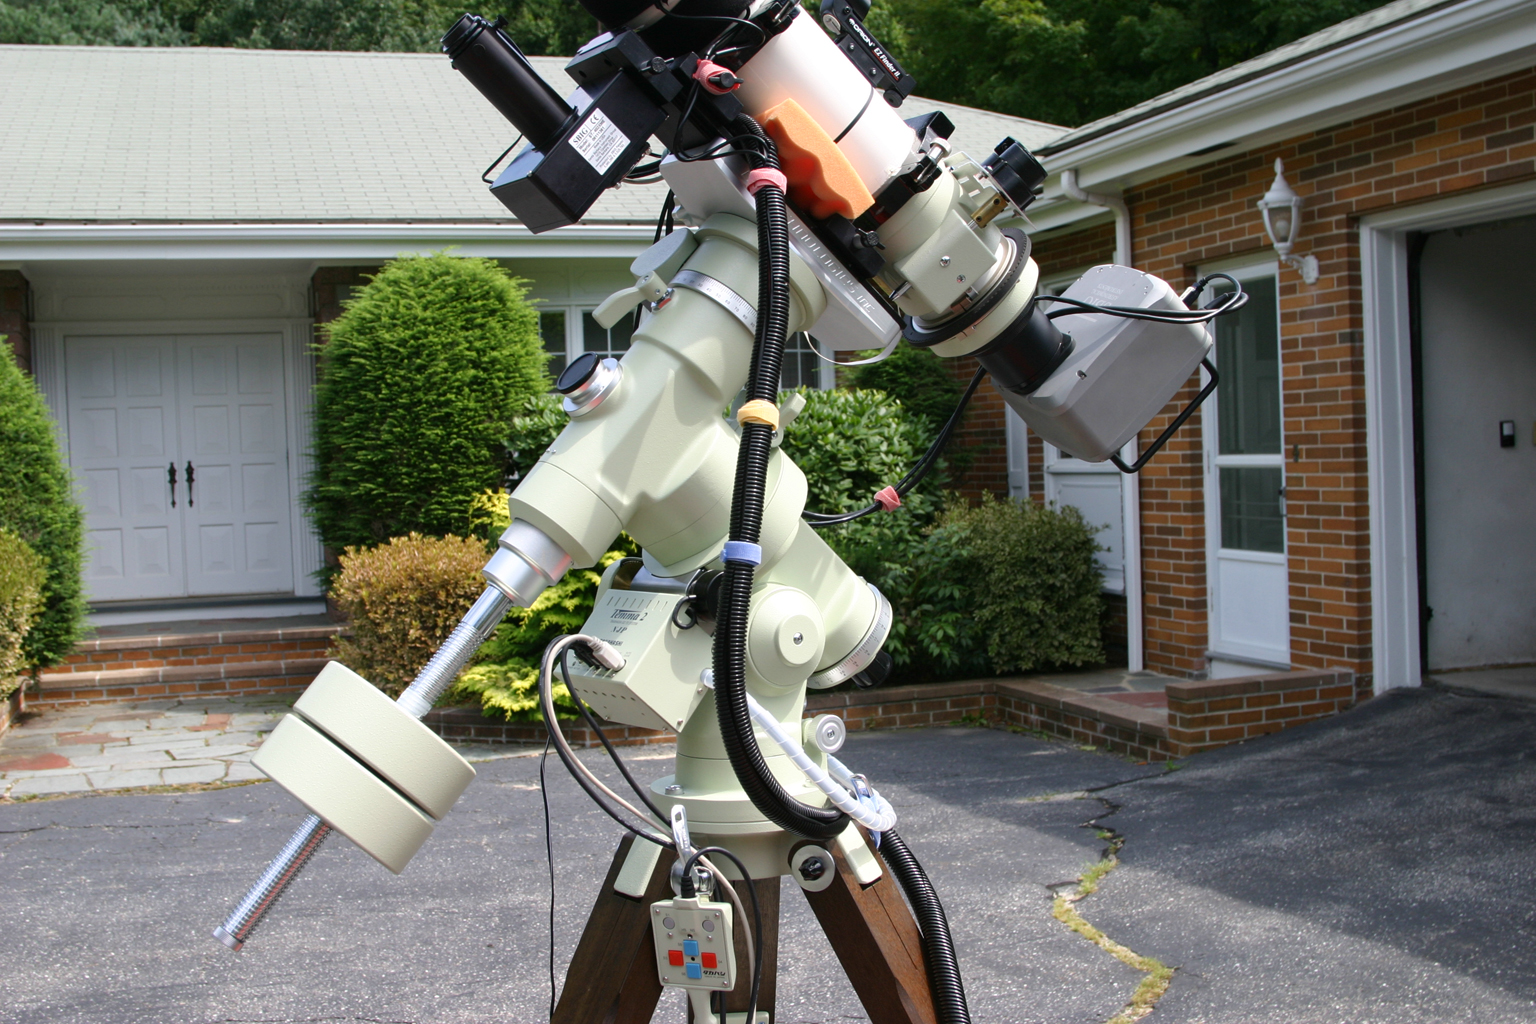
Initially,
I used
a Losmandy G11 with Gemini
GOTO system, upgraded to the Gemini L3 v1.13 EPROM.
This is a good mount for the money, but I noted inconsistent tracking
once I added the FSQ106 (which is a relatively heavy scope), especially
near the
meridian. This resulted in lost imaging time due to many subs
with less than perfect stars. I spent many hours tweaking the G11
but finally concluded that I needed an upgrade. In the summer of
2007, I moved to the Takahashi
NJP mount with Temma 2, shown above, which has been a great
performer. Chuck Faranda has
kindly created a
driver for the NJP Temma system that allows computer control via
ASCOM. The Yahoo
Losmandy Group is a great resource for the G11, and the following
website also contains useful information.
The Yahoo
Takahashi Group is a great resource for Takahashi products,
including scopes and mounts. Other
items/features present in the photos include JMI Wheeley
Bars (a great
backsaver!), and a red tool cart from Sears (a convenient way to store,
transport, and organize equipment both during and after the imaging
session).
Telescopes:
Takahashi
Sky90 (sold):
The
Takahashi
Sky90 shown
in this older photo above is
attached to the
Losmandy dovetail
plate system with a set of Parallax rings, which
fit perfectly and are beautifully manufactured. There
are
miscellaneous items such as the f4.5 field flattener (highly
recommended), spacers, T-mount,
and the Camera Angle
Adjuster in the
imaging train- please consult with appropriate vendors to
tailor the Sky90 components to your needs. In the image, the
Camera Angle Adjuster is first, followed by the focal
reducer, followed by the CA35 adapter and then the
wide T mount, which connects to the filter wheel. The True
Technology Slim Design Filter Wheel uses the SCTM-T-LR
and SCTM-TF adapters (available from Adirondack Video Astronomy).
The
camera connects to the other side
of the filter wheel via the T thread. The Backfocus
distance chart provides a good starting point for determining the
correct distance between the CCD chip and the focal reducer, although
some experimentation is required to get the best results (backfocus is
72 mm for this arrangement, which includes the 17 mm flange to CCD chip
distance of the SXV-H9, or the 28mm
flange to CCD chip distance of the Maxcam CM10).
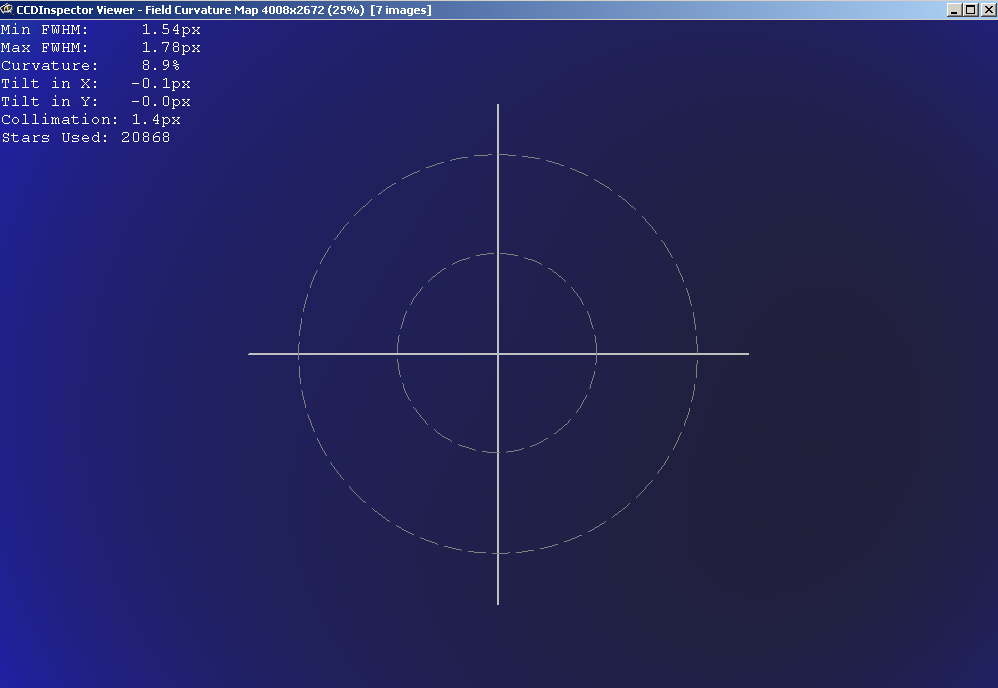
The
curvature map of my Sky90 at f4.5 with the Maxcam CM10 camera (10mm x
14.9mm chip size) is shown here.
Takahashi
FS102 (sold):
The
Takahashi FS-102
is shown here. The
pole that is used to hold up the weight of cables was purchased
as a hanging flower basket item at Home Depot a few years
ago. NOTE: I have arranged my cables differently after this
photograph was taken (see below under "Cable Management"). With
the TOA-130 focal reducer, the f ratio is f6. In this image, the
Camera Angle Adjuster is first, followed by the TOA-130
focal
reducer, the Feldstein #4
adapter (T-thread to FSQ-106, item TCD0008 at Adirondack Astronomy),
and then the Astronomiks filter drawer holder (which is 21 mm
thick). This allows me to insert a 48mm IDAS-LPS filter into the
imaging train when doing LRGB work. The
True Technology Slim Design Filter Wheel uses the same SCTM-T-LR
and SCTM-TF adapters as mentioned above. The Maxcam CM10 is
connected to the other side of the filter wheel via the T thread (an
SCT to T adapter is used inside the CM10 flange, available through
FLI). The backfocus for this arrangement is 83.9mm, which
includes the 17 mm flange to CCD chip distance of the SXV-H9, or the 28mm
flange to CCD chip distance of the Maxcam CM10.
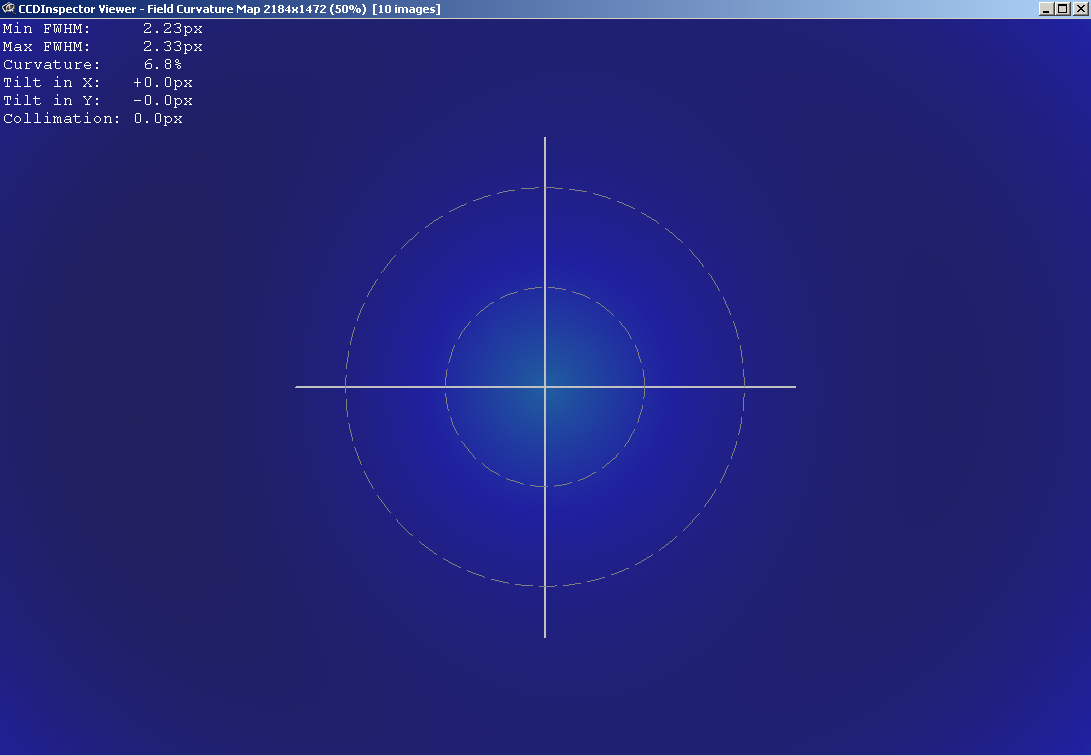
The
curvature map of my FS102 at f6
with the CM10 is shown here.
The corresponding curvature map of my FS102 at f8 with the CM10 (i.e.,
without focal reducer) is shown here.
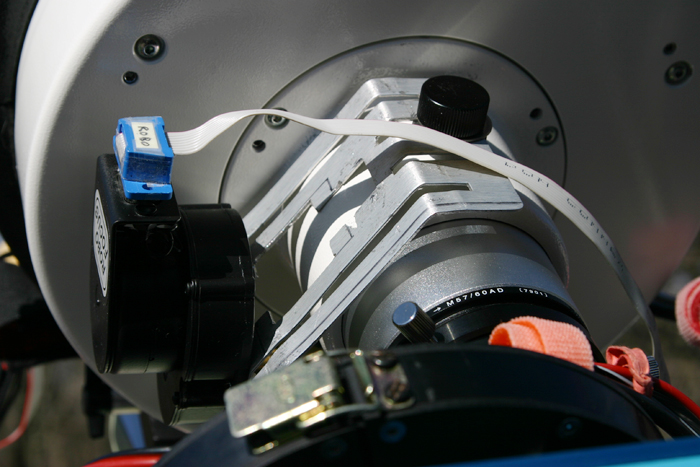
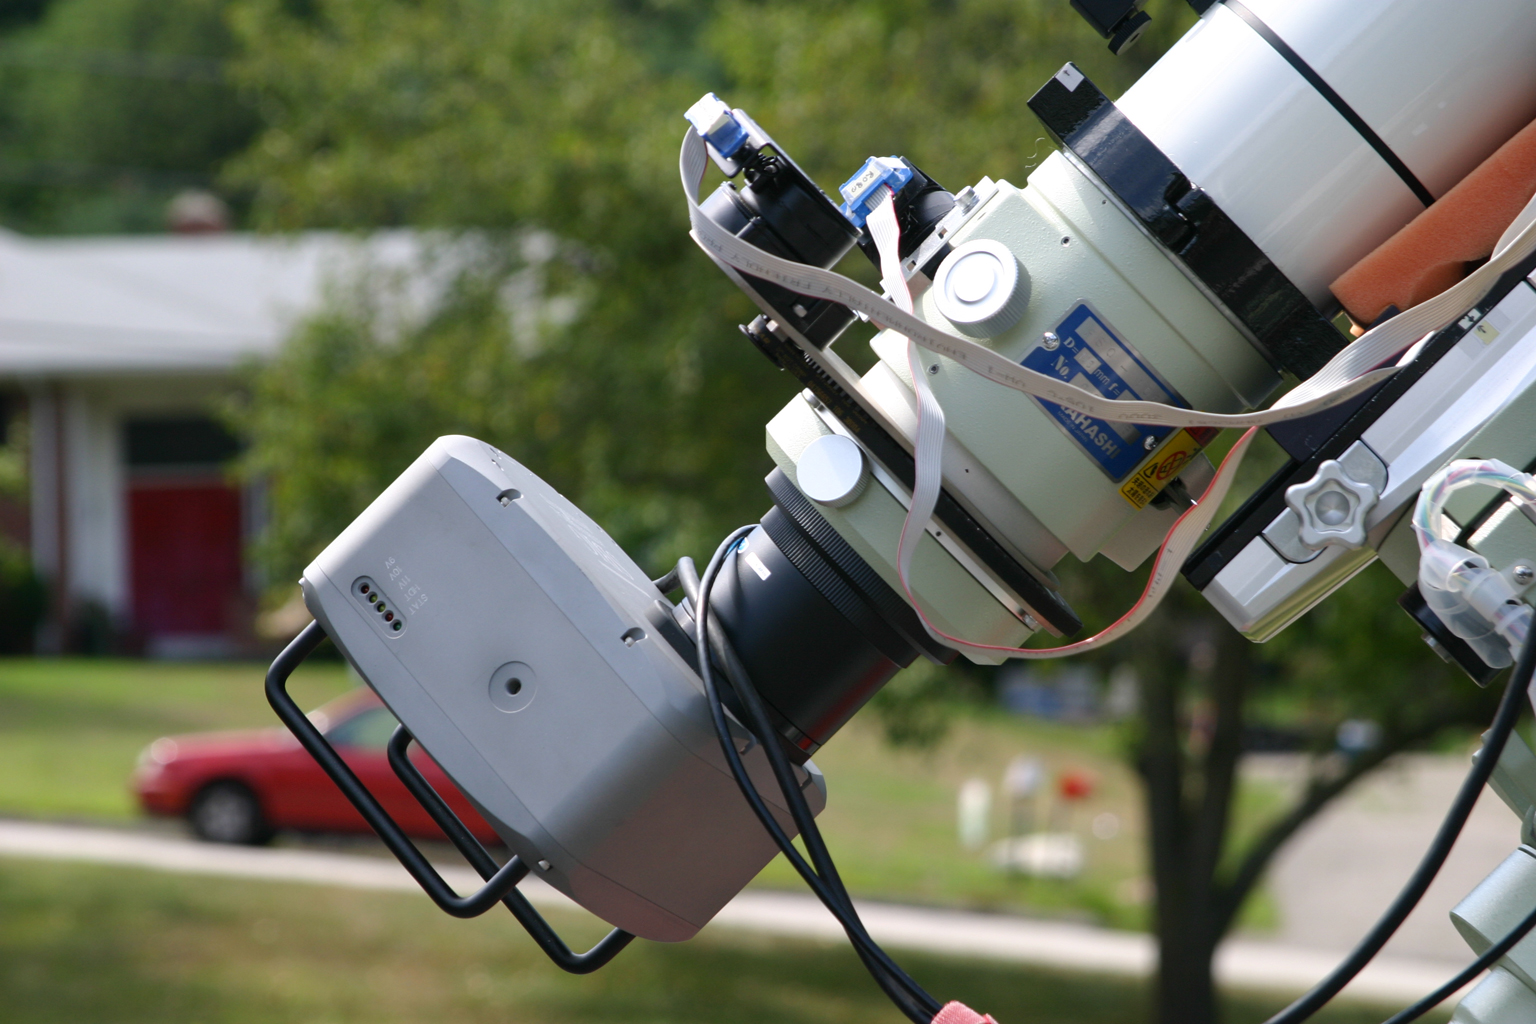
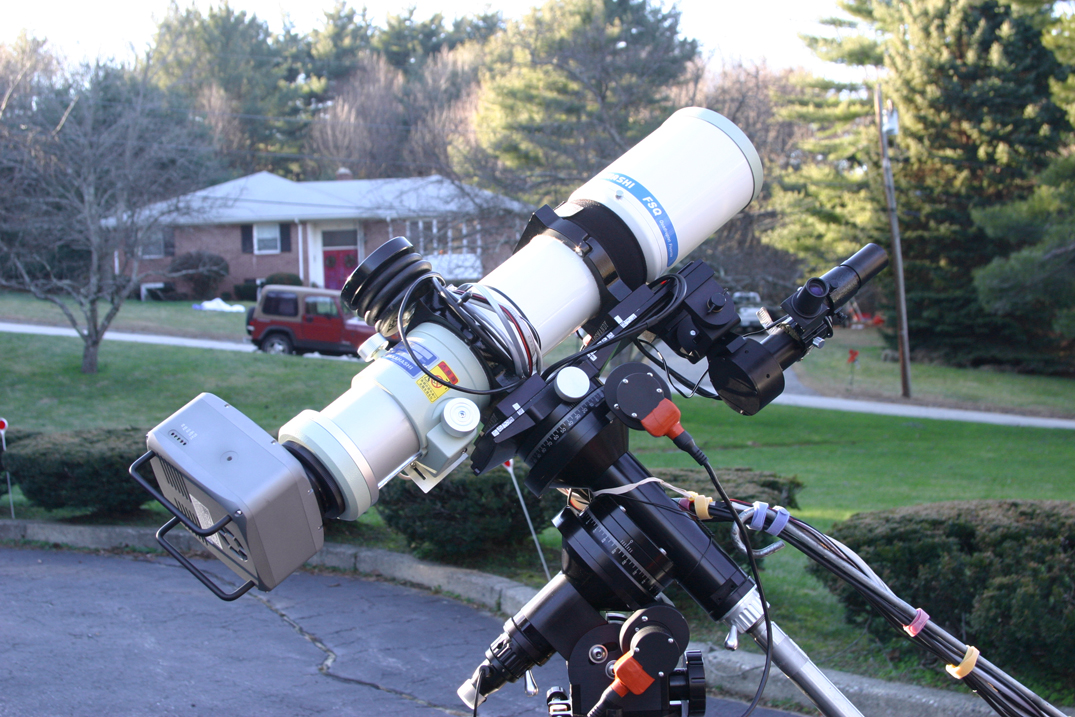
Takahashi
FSQ106N:
I
purchased the FSQ106N (shown above) in the summer of 2006 for
subsequent use
with the STL11K camera, which has a 24 x 36.1 mm array. The above
set up is not used anymore, since I now place the FSQ106N on the NJP
mount, and I guide with the ST402/60mm guidescope piggybacked on top
(see below for image of ST402 with 60mm guidescope on the
VC200L, with more details at the end of this page). The
FSQ106 provides a very flat field that easily accomodates the
large chip of this camera, at the fast speed of f5. I had
considered even faster astrographs (like the
Tak Epsilon 180 and the ASA Newtonians), but I was not convinced that
their
focusers were robust enough to prevent flexure, and I wanted to
minimize
fiddling and
maximize imaging time. The FSQ is always ready to go, produces
nice round stars, and has great focuser that easily accomodates my
Robofocus. I had to adjust the Camera Angle Adjuster in order to
minimize play in the system, which caused stars to be elongated in the
corners of some images. Here is my
post describing this procedure on the Takahashi Yahoo site (I found
this to be a very straight-forward adjustment, but if you decide to do
it, it is at your own risk). Also, Frank Barnes describes a
procedure to tighten up the focuser tube in order to reduce play that
can lead to tilt. His procedure may be downloaded here,
and it is mentioned
on the Takahashi Yahoo group as well.
See the camera section below for details regarding how
I attach the STL11K camera to the FSQ106. Please click here for
the curvature
map
of my FSQ106 and STL11K. See below under "CCD cameras" for
details regarding my setup with the FSQ106N and the U16M/FW50-7S.
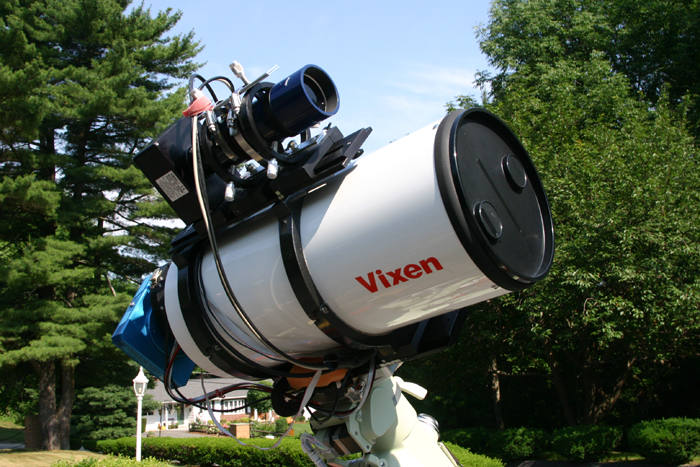
Vixen
VC200L:
I
wanted a lightweight, longer focal
length scope for imaging galaxies and planetaries in greater detail and
decided to purchase the Vixen VC200L, which is a modified Cassegrain
design (shown above). This scope has an 8" aperture and a native
focal length
of 1800mm at f9. I mounted it with Parallax rings,
and I attached a Losmandy dovetail plate on top to mount a
60mm guidescope (227mm at f3.7, with the ST402 autoguider) described
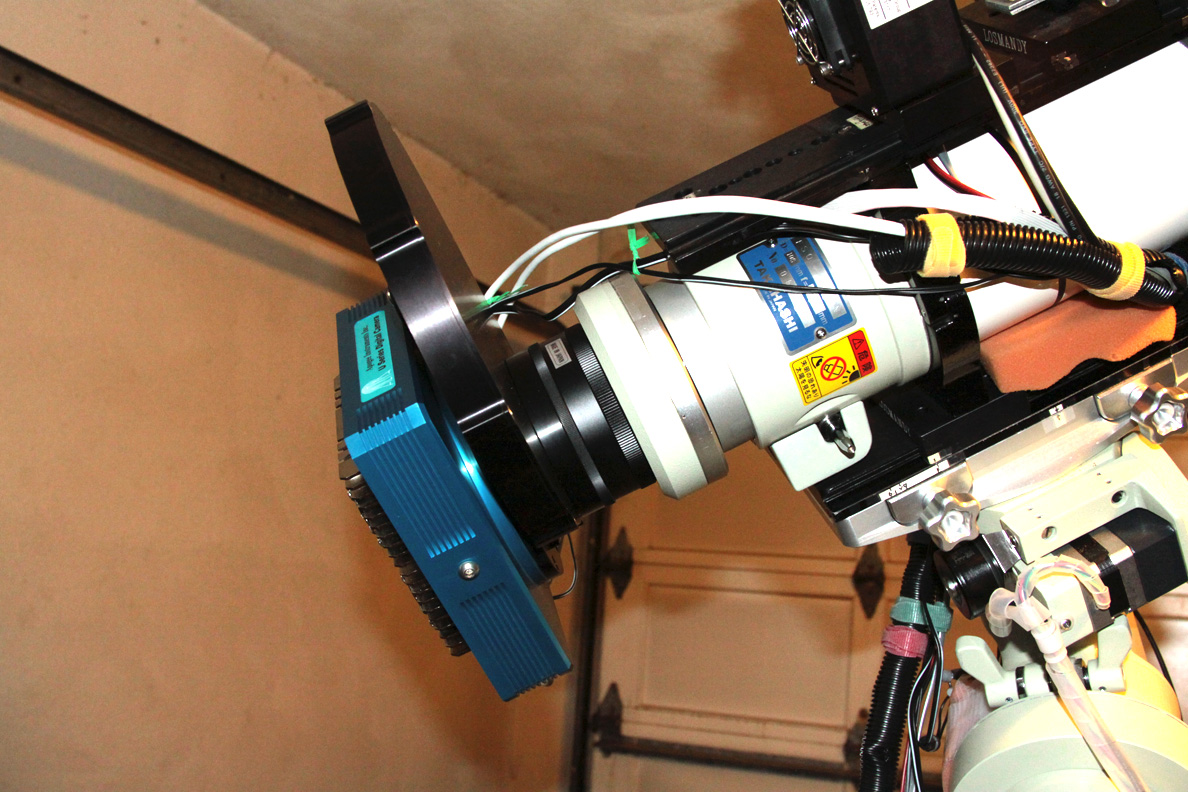
more fully in the "Autoguider" section below.
To
attach the Robofocus (shown below),
I simply used
the metal bracket provided by Technical Innovations and shaped it as
required to accomodate the focuser lock screw as shown below. I
used a few washers under the lock screw to prevent it from actually
locking the focuser tube in place. I find this to be a simple and
very sturdy arrangement that permits accurate focusing without
noticeable play.
Modifications to the
VC200L:
I have made two modifications/adjustments to the VC200L which have
improved its
performance. These are 1) Reducing the thickness of the
spider vanes holding the secondary by using a Makita 4" grinding wheel
as well as a metal file (lots of tiny metal particles fly around when
you do this, so it's important to wear a mask and eye protection, and
you do this at your own risk). This procedure is not for the
faint of heart and takes about two hours of hard work. It
requires removing the front spider vane assembly (and obviously
removing the secondary) from the OTA, since you definitely don't want
mirrors/optical elements anywhere near the metal filings. The
reward for doing this is thinner vanes
that completely prevent the
problem with square shaped stars and also permit better resolution of
smaller stars since less light energy is being diffracted. 2) Removing the mirror
cell for cleaning, and at the same time loosening the 6 metal
brackets/screws that hold the mirror in its cell, since these were too
tight and prevented any mirror movement (you want the mirror to move
about 1 mm in any given direction to prevent asymmetric stress that
could cause optical aberrations, including triangular stars). I
believe that this step is critical, in order to avoid problems with
triangular-shaped stars that are characteristic of pinched
optics. I
found this website
very helpful during this process.
The
VC200L Yahoo
site is a great resource, especially for files related to
collimation, which is critical for obtaining the best performance from
this scope.
CCD cameras:
1.
SXV-H9 monochrome CCD camera
(sold) from Starlight
Xpress. This ABG has good sensitivity and very low dark
current, making dark frames generally unnecessary.
2.
MaxCam monochrome CM10 camera
from Finger Lakes
Instruments, with the Kodak full frame 3200 ME (microlensed)
chip (this chip was
subsequently removed and placed into the Apogee U32 platform as
described below). I
purposely requested not to have a cover slip, in order to avoid
reflections from brighter stars (and to avoid the slight decrease in
light transmission seen with the coverslip in place). This NABG
chip
is very sensitive, with a reported QE for Ha light of 85%.
UPDATE, 7/27/07: I have been having problems with horizontal
bands due to clocking issues with this camera, which does not have a
full frame buffer. I e-mailed FLI in early June
for details
regarding an upgrade by transferring my chip into the new Microline
platform (which is supposed to have a full frame buffer). I was
told that they would get back to me with
pricing "soon." No further response, and after several weeks I
called again to discuss. I was again told that I would be
provided with information "soon." After two months without a
definitive answer about availability or pricing, I called Tim Puckett
at Apogee Instruments to see if he could
help. Tim was very responsive, and I upgraded my KAF3200 chip
into the U32 platform (details below). Time between my first
phone call to Tim and having the upgraded camera in my hands was about
3 weeks.
3.
STL11000M, class 2 chip (sold) from Santa
Barbara Instruments Group.
I
purchased the STL11K in November 2006 for use with the FSQ106. It
is
coupled
to the FSQ106 through the use of the Feldstein
#6 adapter, which provides a simple and strong connection. I
also use a 72mm Tak extension tube (about 2.25" long), part number
TKA2350, in order to rack the focuser in as much as possible so as to
minimize focuser sag due to the weight of the camera. I
loaded the built-in filter wheel with unmounted 2" filters to minimize
vignetting (LRGB filters from Astronomiks, and the Ha 7nm filter from
Baader). This camera is great fun to use! Images of this
set up can be found here and
here.
4.
Apogee Instruments U32 Camera. The details of this
camera may be found here.
The camera is beautifully designed, with a pleasing blue anodized
surface, 4 cooling fans, a robust cooling system (50 degrees C below
ambient), a full frame buffer (32 Mb), and several user adjustable
controls, including fan speed. The opening contains C threads,
and I purchased a C
to T female adapter from Edmunds (part
#NT53-483) in order to attach it to
the Starlight Xpress USB filter wheel (described below).
5. Apogee Instruments U16M camera. The KAF16803 measures
4096 x 4096 pixels and is a very clean, low dark current chip.
The camera is beautifully made, cools to -40 C delta in 30 minutes, and
is attached to the FW50-7S filter wheel (7 slots for 50 mm Baader
square filters, described below). The detail of this large chip camera may be found here, and an image of this
setup is seen below:
The imaging train for this setup is based upon the following
considerations. With the focuser tube fully retracted into the
scope, the backfocus of the FSQ106N is 120mm, as measured from the end
of the CAA (with the 72mm black ring adapter removed so that the opening
is 92mm). I wanted the focuser tube to extend outward only about
20mm, to avoid flexure problems due to the weight of the U16M and
filter wheel (20 mm would give me plenty of room to obtain V curves
using Focusmax, for instance). This means that I have 100mm left
(120-20) to be made up by the camera, filter wheel, and adapters.
The optically corrected flange to chip distance of the U16M D07 model
is 1.008", the optically corrected thickness of the FW50-7S filter wheel is 0.900", and the thickness of the
adapter plate that connects the filter wheel to the camera is 0.250",
making a total of 2.158", or 54.81mm. But I want to make up a
total of 100mm, which means that I still need 100-54.81mm, or about
45mm, in extra adapters. I achieved this with two other adapters
1) a 20mm long adapter made by Ashley Stevens at Precise Parts,
which
screws into the Apogee filter wheel on one end (3"- 24 TPI) and then
has a 92mm (female) opening on the other end, and 2) a 25mm long spacer
ring (92mm opening) from Takahashi (part # TAR0130, Texas Nautical
Repair), which screws into the 92mm Precise Parts adapter on one end,
and the CAA (92mm) on the other end. This gives me 54.81+20+25 =
99.81mm, meaning that my focuser tube will extend out by 120-99.81mm,
or 20.19mm (close enough!).
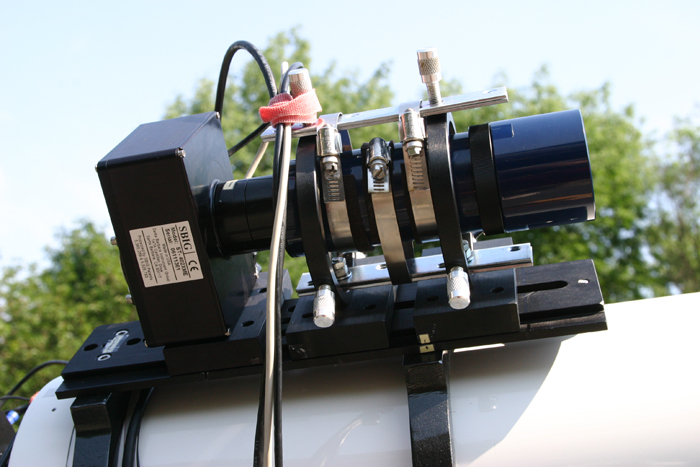
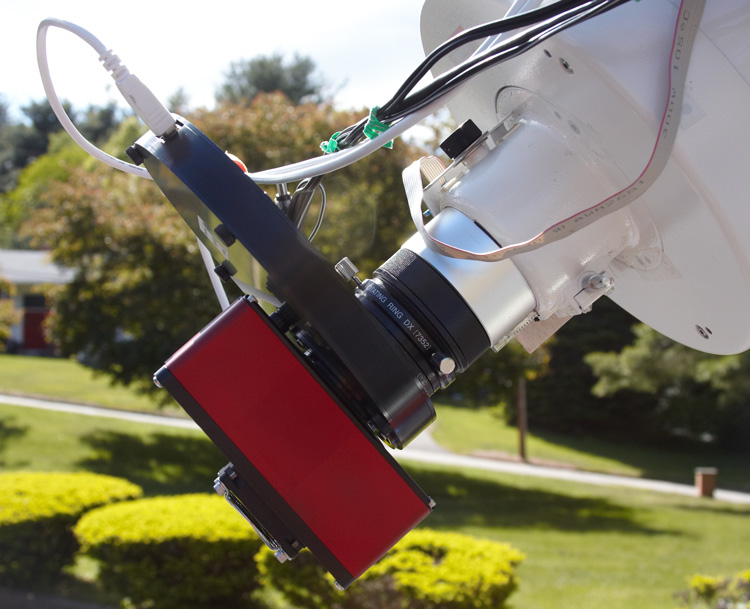
6. SBIG
ST8300. The details of this
camera may be found here.
The camera is small, lightweight, and a perfect fit for my VC200L
(image below).
The ST8300 camera is
shown above, attached to the VC200L in f6.4 configuration. The
imaging train shown above is as follows (from right
to left): M60
adapter (included with the Vixen focal reducer), M60-M57 adapter (Borg
#7901), rotator (Borg #7352), M57 to male T thread (Borg #7522), Starlight USB powered
filter wheel (T thread female on telescope side and T thread male on
camera side), ST8300
camera. Alternatively, I use a C
to T adapter (Edmund's #NT53-483) to attach the U32
camera to the Starlight filter wheel when using this scope.
Filter wheels:
1. True Technology Slim Design
Filter Wheel (not used anymore).
2. The STL11K has its own
built-in filter wheel.
3. Apogee FW50-7S for the U16M
(50mm square filters).
4. Starlight Xpress USB powered
5 position wheel for 2" filters. I use this in conjunction
with my ST8300 camera as well as my Apogee U32 cameras.
Filters:
1.
For the True Technology Slim Design Filter
Wheel (used for U32 and
SXV-H9 cameras): Astronomik
1.25" filters (Clear, Ha 12nm, Ha 6nm, OIII, R, G, and B). I like
these filters because they are durable and reasonably priced. For
Ha
work, I initially used the 12 nm bandpass filter with the Sky90/SXV-H9
set up at
f4.5 with good results. When I moved to the FS102/U32 set up at
f6, I wanted the narrower Ha bandpass (6 nm) in order to obtain more
contrast
while at the same time minimize blooming with the U32
(NABG).
2.
For the STL11K (internal filter wheel), I use unmounted 50.8mm
filters to
minimize
vignetting (LRGB filters from Baader, the 7nm Ha filter from
Baader, and the 8.5nm OIII filter from Baader). I have been very
impressed with the narrowband Baader filters- they
have minimal problems with halos, they yield great contrast, and they
are a terrific value when compared to much more expensive filters on
the market. Given how expensive this hobby already is, and given
the excellent
performance of the Baader narrowband filters thus far, I simply
cannot justify spending even more money on filters. Johannes
Schedler also uses Baader narrowband filters and has posted a
review
of the Baader LRGB set on this website.
3. Because I like the Baaders from my experience with the STL11K,
I purchased a set of 50mm square Baader filters for the U16M from
Alpine Astronomy- LRGB, HII
(7nm), OIII (8.5nm), and SII (8nm).
4. For the Starlight 5 position, 2" filter wheel, I use 2"
mounted Baader filters (LRGB and 7nm Ha).
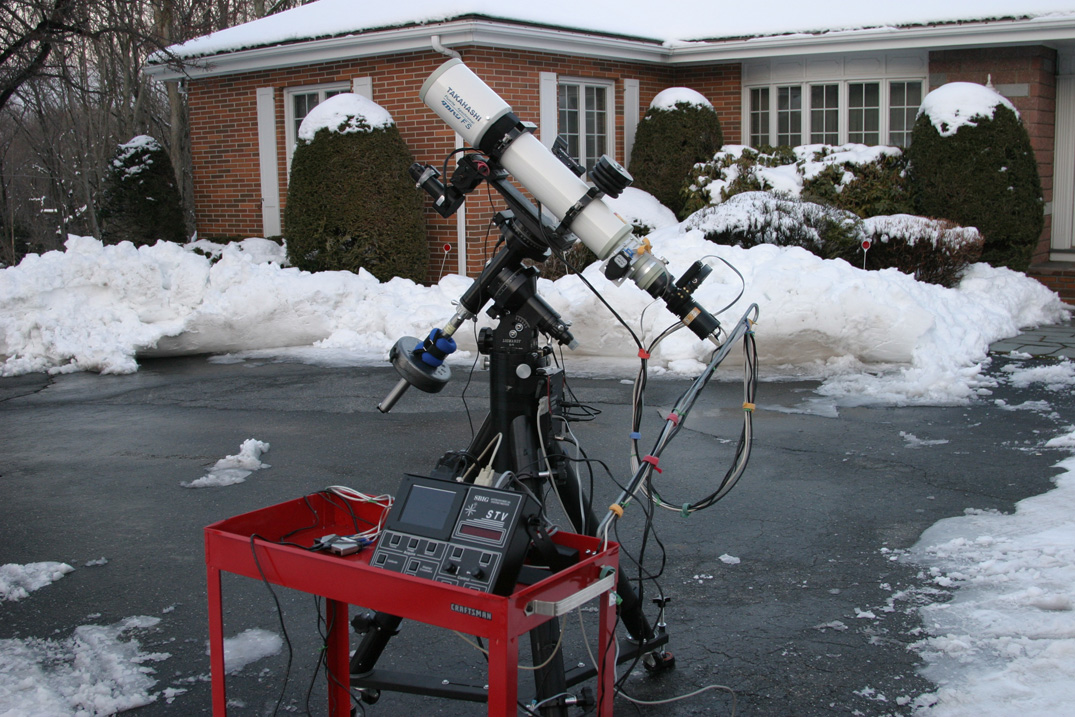
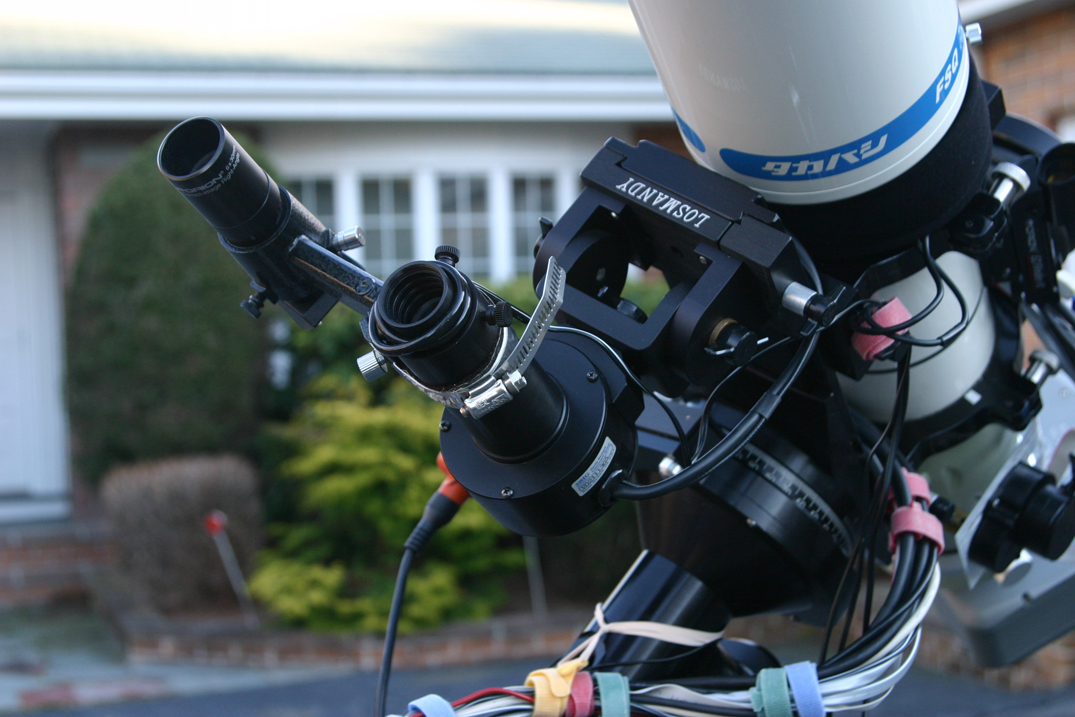
Autoguider:
I
used an SBIG STV
(sold) with
the e-finder for several years, but later switched to an SBIG
ST-402 (shown below), which is more
sensitive
and permits remote operation through Maxim. Like the STV, I have
used
the ST-402 with the e-finder, and this arrangement has always provided
an excellent choice of guidestars. However, the image scale of
this arrangment was 18.5"/pixel, which is insufficient for guiding the
VC200L (image scale 0.78"/pixel at f9 with the U32 camera). In
order to solve this problem, I remembered that I had an old finderscope
from my 23
year old Meade LX 2080 8" SCT
(remember that scope?). This finderscope has a great
60mm aperture, 227mm focal length objective (f3.8) and results in an
autoguider image scale of
around 8.1 "/pixel when used with the ST402. Below
is shown how I attached the guidescope to the mount, including hose
clamps to ensure stability (clamps attached to 6" metal plates from
Home Depot on top and bottom; guidescope OTA protected by felt).
Note that the ST402 itself is not
physically attached to the guidescope, but fits into the back end of
the
guidescope using 2, 20mm T spacers to provide the correct
backfocus and to eliminate outside light. Fine tuning of focus is
easily achieved by turning the
objective at the front end of the guidescope, and then tightening the
lock ring to ensure stability. This arrangment is rock solid and
has thus far guided beautifully, without a hint of flexure:
Focuser:
A Robofocus
unit which permits
extremely
accurate and rapid focusing in conjunction with Focusmax
software (used through MaximDL/CCD).
Cable
management:
Proper
cable management is a critical aspect of imaging throughout the
night. I use plastic
cable wrap from a local electronics store for this purpose.
Computer:
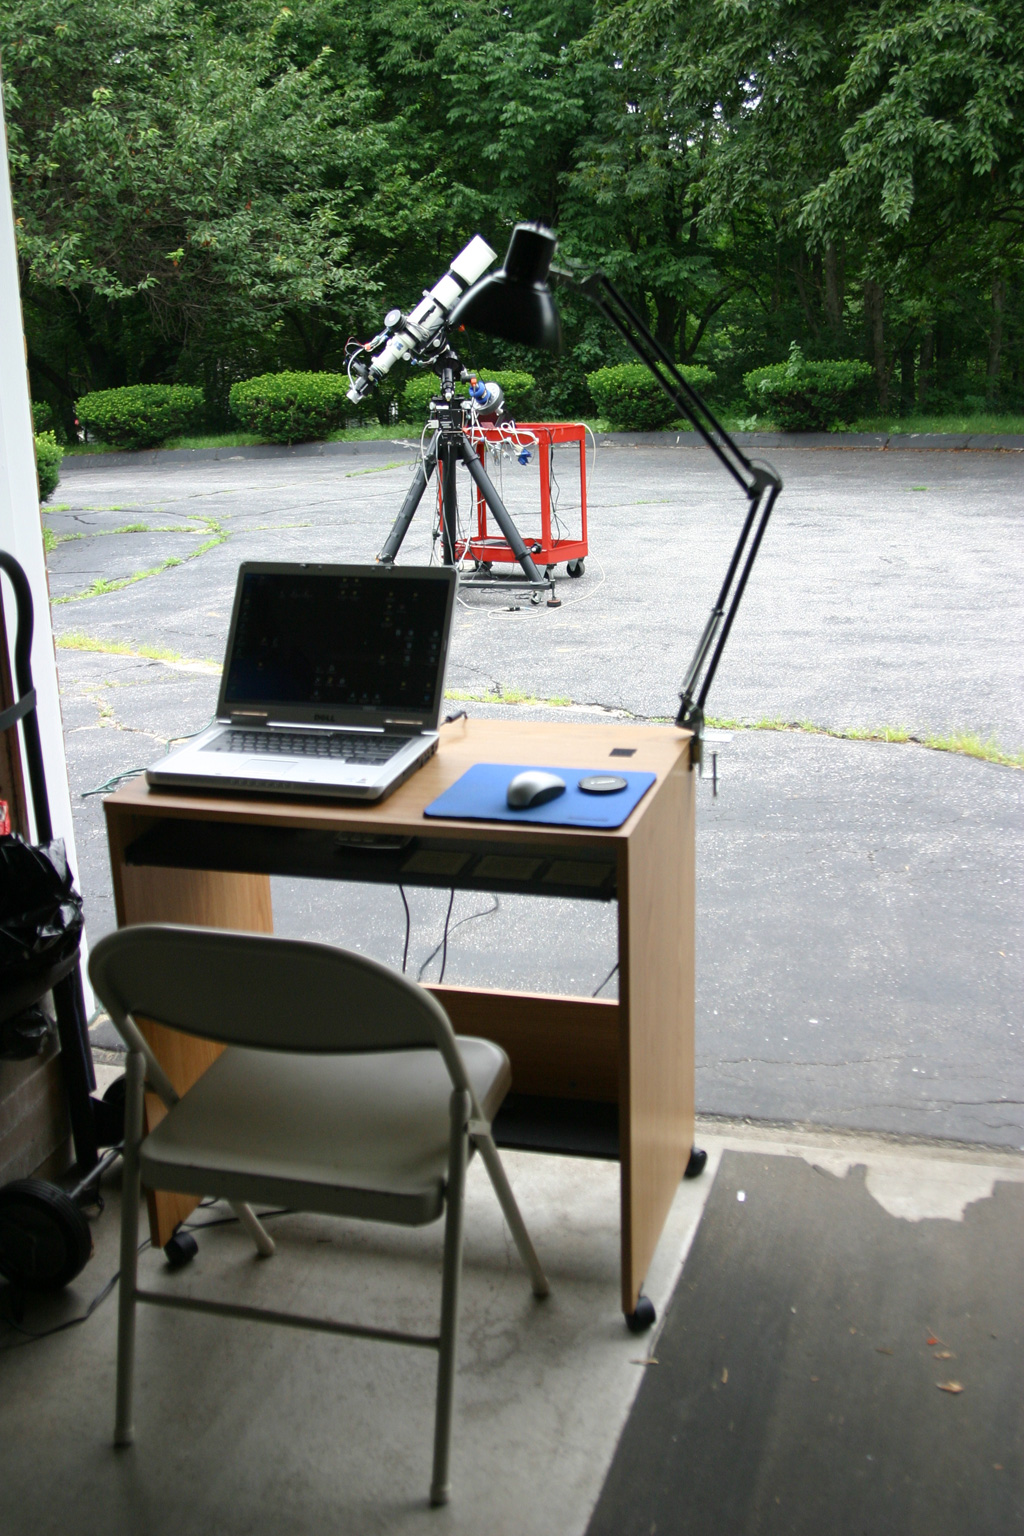
My "control center" is about 30 feet away, within the garage that
closes after set-up. I use a USB 16' active extension cable in
the USB train to allow me to image from 30' away. The 7 port USB hub near the
scope accepts input from several items, including the Gemini,
Robofocus, True Technology filterwheel, Takometer, and ST-402
autoguider. Computer control is from a Dell
Inspiron E1505 with a 2 Ghz dual core processor and 2 GB RAM, along
with a
wireless mouse, as shown above.
Dew prevention:
Dew Straps from Scopestuff.
I also use an
old eyepiece heater coil that I purchased from Scopetronix to prevent
dew formation on the e-finder.
General
guidelines for CCD imaging:
Please see The Gallery
page
for CCD images. A description of photographic details is provided
for each CCD image.
Recommended
software/resources that
I use (not all are required): ImagesPlus, MaximDL/CCD, Registar,
Photoshop CS, StarryNight, The Sky 6, FocusMax, PoleAlignMax, CCD
Commander, Chuck Faranda's Temma driver for Takahashi mounts, Bob
Vanderbei's Fat Tail Deconvolution script, Russell Croman's Gradient
X-terminator, Ron Wodaski's Debloomer Plug-in.
Check out the Links
page as well for
additional tips/resources: Links
Home